


Strawberry cheesecake protein balls offer a healthy, no-bake treat. Packed with protein, these easy bites are perfect for a quick snack or post-workout boost.
You know those days? The ones where you really want something sweet, but your body is screaming for something… not a sugar crash? That was me, mid-afternoon, dreaming of cheesecake. But who has time for baking? I started messing around with protein powder and what I had in the pantry, and bam! These no-bake Strawberry protein Balls were born. Honestly, they’ve been a lifesaver for my sweet tooth ever since.
Oh, the first time I made them, I got a little too excited with the freeze-dried strawberries. I crushed them into oblivion, thinking more dust meant more flavor. Nope! The dough turned a vibrant, unsettling magenta, and the texture was… gritty. My husband took one bite and said, 'Did you accidentally add sprinkles to the inside?' Lesson learned: a gentle crush is key!
The Good Stuff: Ingredients for Your Strawberry Protein Balls
- 1 cup rolled oats (old-fashioned): These are the backbone, hon! Old-fashioned oats give our protein balls that lovely chew and a nice dose of fiber. Don't go for instant oats here, they'll get mushy and won't hold up. I keep a big bag in my pantry because they're so versatile for breakfast, baking, and, well, making these yummy treats! They add that wholesome texture we love.
- 1 cup vanilla protein powder: Your secret weapon! This is where the 'protein' in our Strawberry Protein Balls comes from, obviously. I always use vanilla because it complements the strawberry and cheesecake flavors so beautifully. Choose one you actually like the taste of, 'cause it'll shine through. I've tried a few duds, and trust me, it makes a huge difference in the final taste!
- 1/2 cup raw cashews (soaked and drained, or 1/2 cup cashew butter): Oh, these little gems are what give us that creamy, dreamy cheesecake texture. Soaking them makes them super blendable and creates a rich, smooth base. If you're short on time, cashew butter works like a charm too! I once forgot to soak them, and my food processor sounded like it was going to stage a rebellion. Oops! Trust me, soak 'em if you can.
- 1/2 cup light cream cheese (softened): Hello, cheesecake flavor! This is what transforms these from just 'protein balls' into 'cheesecake' protein balls. Make sure it's softened, or you'll have lumpy bits, and no one wants lumpy cheesecake. I've tried dairy-free versions, and they work, but the classic just hits different, you know? It's the key to that tangy, rich taste.
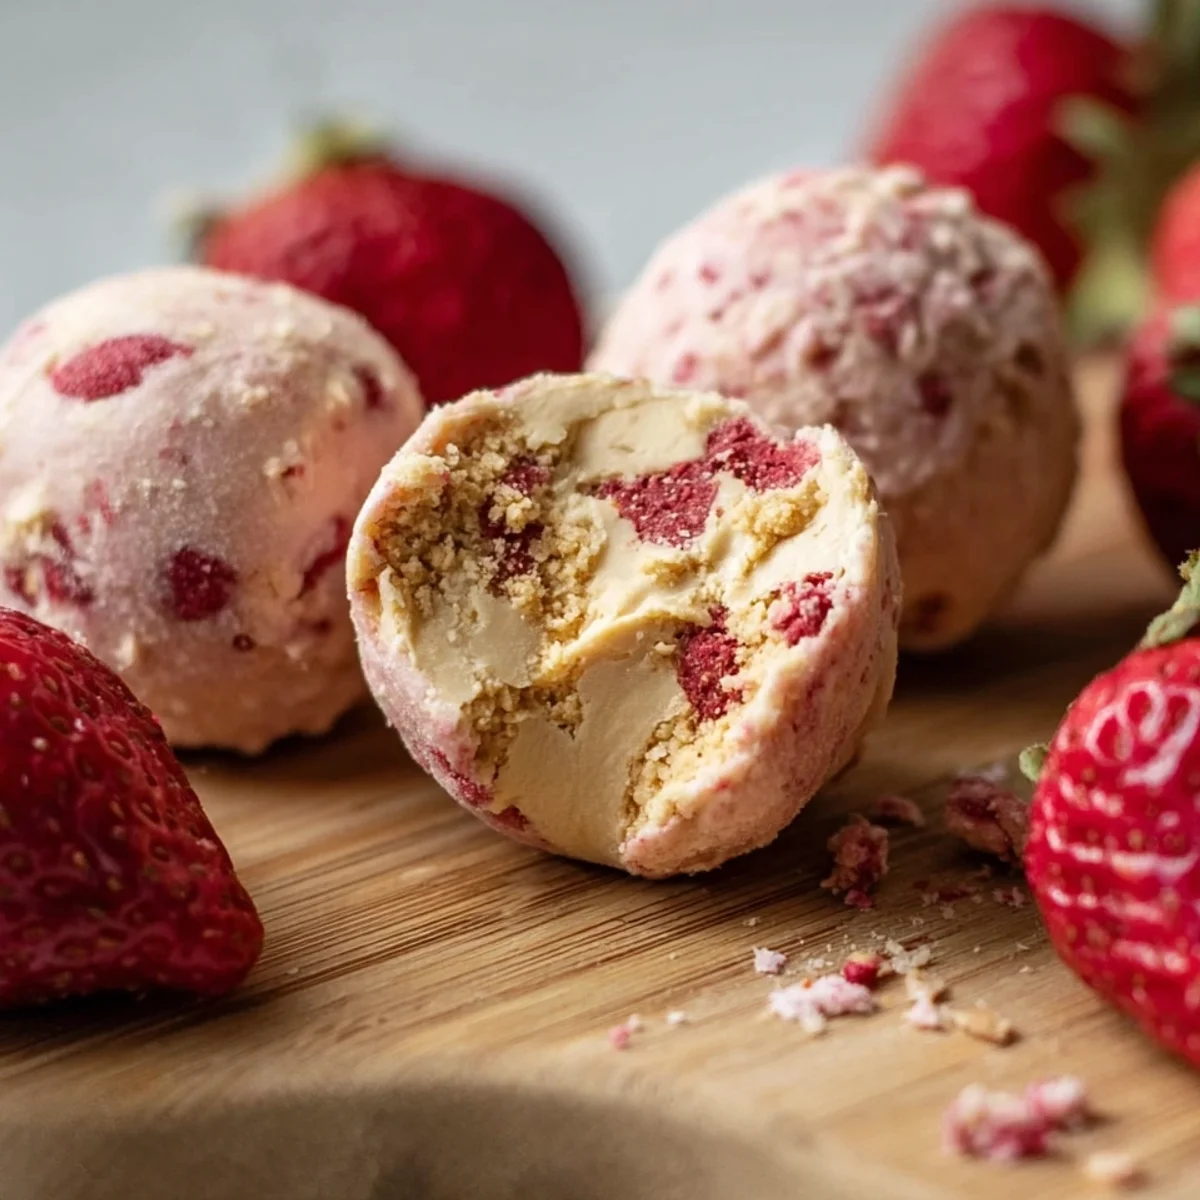
- 1/2 cup freeze-dried strawberries (crushed): These are the star of the show, bringing that intense, natural strawberry burst to these Strawberry Protein Balls! Crushing them releases all that vibrant flavor and color. Don't over-crush them into a fine powder, though, you want some tiny pieces for texture. I keep a secret stash just for these and sprinkling on my yogurt. They're pure strawberry magic!
- 1/2 cup Medjool dates (pitted, packed): Nature's candy and our natural binder! Dates add sweetness and help hold everything together without any weird stickiness. Make sure they're soft and fresh, not dried-out little rocks. If yours are a bit firm, a quick soak in warm water for 10 minutes makes all the difference. I learned that the hard way with a very crumbly batch once! They're essential for the chew.
Making Magic: Your Step-by-Step Guide to Strawberry Protein Balls
- Step 1: Prepare Cheesecake Base:
- First things first, let's get that glorious cheesecake base going. Toss your rolled oats, vanilla protein powder, cashews (or cashew butter), softened cream cheese, maple syrup, vanilla extract, lemon zest, and that tiny pinch of sea salt into your food processor. Pulse it up until it forms a thick, somewhat sticky dough. You might need to scrape down the sides a few times. This is the heart of your Strawberry Protein Balls, so make sure it's well combined and smelling fantastic!
- Step 2: Create Strawberry Swirl:
- Now for the fun, fruity part! Take those pitted Medjool dates and the crushed freeze-dried strawberries and add them to the food processor. If you're using soaked cashews, you might want to give them a quick rinse and drain before this step. Pulse again, but this time, you're looking for a slightly chunkier, vibrant red mixture. This is our 'swirl' component, packed with intense strawberry flavor for these no-bake strawberry cheesecake protein balls.
- Step 3: Combine & Swirl:
- Time to bring it all together! Gently add the strawberry-date mixture to the cheesecake base in the food processor. Pulse just a few times, briefly. You're not trying to fully combine it into one color, we want those beautiful pink swirls peeking through! This is where the 'cheesecake swirl' magic happens, making each bite of these Strawberry Protein Balls a little surprise. Don't overmix, or you'll lose the effect!
- Step 4: Form Protein Balls:
- Now for the hands-on part! Scoop out about a tablespoon of the mixture. Roll it between your palms to form a nice, tight ball. You want them to be uniform in size, so they chill evenly. It might be a little sticky, but that's okay! If it's too sticky, pop the mixture in the fridge for 10-15 minutes. This step is super satisfying, seeing your no-bake strawberry cheesecake protein balls take shape.
- Step 5: Prepare Crumb Coating:
- This little detail elevates our protein balls from good to amazing! Take your remaining crushed freeze-dried strawberries and spread them out on a shallow plate. This vibrant pink coating adds an extra pop of flavor and a gorgeous visual appeal. It's like a little dusting of joy. I sometimes add a tiny bit more lemon zest to this plate for an extra zing, giving them that extra sparkle!
- Step 6: Coat & Chill:
- Okay, almost there! Gently roll each formed protein ball in that crushed freeze-dried strawberry coating, pressing lightly so it sticks. Place them on a plate or baking sheet lined with parchment paper. Now, the hardest part: chilling! Pop them in the fridge for at least 30 minutes to firm up. Honestly, the wait is worth it, they get so much better and chewier when cold!
Making these has become a ritual for me. There's something so therapeutic about the whir of the food processor, the vibrant pink coming together, and then rolling each little ball. It's a quick escape, a moment of mindful creation that results in something truly delicious. I love knowing I'm prepping healthy snacks for the week, and it fills my kitchen with such a sweet, fruity aroma!
Keeping Them Fresh: Storage Tips for Your Strawberry Protein Balls
Okay, so you've got a batch of these beauties, now how do you keep 'em fresh? My go-to is an airtight container in the fridge. They'll stay good for up to a week, maybe even a bit longer if they last that long in your house they never do in mine! I once left a batch out overnight, thinking they'd be fine since they're 'no-bake.' Oops! The cream cheese got a little sad, and they lost their firm texture. Not a disaster, but definitely not ideal. For longer storage, you can freeze them for up to a month! Just pop them in a freezer-safe bag or container, separating layers with parchment paper. Thaw in the fridge or enjoy them straight from the freezer for a super-chilled treat.

Mix It Up! Smart Swaps for Strawberry Protein Balls
I've played around with so many variations of these! If you're out of vanilla protein powder, chocolate could work for a chocolate-strawberry vibe, but vanilla is my favorite here. For the cashews, almond butter or even sunflower seed butter could stand in, but the flavor profile will shift, becoming less 'cheesecake-y.' Maple syrup can be swapped for agave or honey, just adjust to your preferred sweetness. Don't have freeze-dried strawberries? A little strawberry extract and finely diced fresh strawberries (blotted dry) could work in a pinch for the base, but you'll lose that intense color and crunch from the coating. I tried fresh strawberries for the coating once it was a soggy mess, trust me!
How to Enjoy Your Strawberry Protein Balls
How do I love to serve these? Oh, let me count the ways! They're perfect as a grab-and-go breakfast when you're rushing out the door. My favorite is having one with my morning coffee it feels like a little treat to start the day. They're also fantastic as a post-workout refuel, giving you that protein boost and natural sugars. Honestly, they make an amazing healthier dessert after dinner, especially if you're craving something sweet but want to keep it light. Sometimes, I'll even crumble one over a bowl of Greek yogurt with a few extra fresh berries for a little parfait action. They're so versatile, you'll find yourself reaching for them all the time!
The Sweet Inspiration Behind These Strawberry Protein Balls
While these specific no-bake strawberry cheesecake protein balls are my own little kitchen creation, they really draw inspiration from two classic American comfort foods: the beloved cheesecake and the ever-popular protein bar. Cheesecake, as we know it today, has roots stretching back to ancient Greece, but the creamy, sweetened cream cheese version we adore was popularized in New York. Protein bars, on the other hand, are a much more modern invention, born from the fitness and health food movements of the late 20th century. My recipe is a fusion of these two worlds taking the decadent, satisfying flavor of a strawberry cheesecake and transforming it into a convenient, nutrient-dense snack. It's like bringing a little bit of that classic dessert joy into our busy, health-conscious lives, but without any of the fuss!
So there you have it, my friends! These no-bake strawberry cheesecake protein balls are truly a labor of love, born from a craving and a little kitchen experimentation. I hope you love making and eating them as much as I do. They're such a bright, delicious way to sneak in some goodness. Give them a try, and don't forget to share your creations or any fun twists you come up with in the comments below! Happy snacking!

Burning Questions About Strawberry Protein Balls? I Got You!
- Can I use fresh strawberries instead of freeze-dried?
For the coating, no, stick to freeze-dried for that vibrant crunch and color. For the internal 'swirl,' you could try a small amount of finely diced, well-blotted fresh strawberries, but the flavor won't be as intense, and the texture might be softer. It's just not quite the same, honestly.
- How long do these last in the fridge?
In an airtight container, they're good for about a week in the fridge. Honestly, mine rarely make it that long because they're just too tempting! They're perfect for meal prepping your snacks for a few days, so you always have something healthy ready to grab.
- Is there a dairy-free option for the cream cheese?
Yes! I've successfully used dairy-free cream cheese alternatives before. Just make sure it's a brand you like the taste of, as it will impact the overall flavor. The texture works just as well, so don't be afraid to experiment to fit your dietary needs!
- My mixture is too sticky to roll. What should I do?
This happens sometimes! Pop the entire mixture back into the fridge for about 15-20 minutes. Chilling it firms it up and makes it much easier to handle and roll into perfect little balls. Patience is key here, and it makes the whole process smoother!
- Can I use a different type of protein powder?
You totally can, but be mindful of the flavor. Vanilla works best here to complement the strawberry and cheesecake. Chocolate could be fun, but unflavored might make them a bit bland, so you'd need to adjust sweetness. Just pick one you enjoy, it really comes through!
Strawberry Cheesecake Protein Balls (No-Bake)
Strawberry cheesecake protein balls offer a healthy, no-bake treat. Packed with protein, these easy bites are perfect for a quick snack or post-workout boost.
Ingredients
Velvety Cheesecake Core
- 1 cup rolled oats (old-fashioned)
- 1 cup vanilla protein powder
- 1/2 cup raw cashews (soaked and drained, or 1/2 cup cashew butter)
- 1/2 cup light cream cheese (softened)
- 1/4 cup maple syrup
- 1 tsp vanilla extract
- 1 tsp lemon zest
- Pinch of sea salt
Strawberry Swirl & Natural Sweetness
- 1/2 cup freeze-dried strawberries (crushed)
- 1/2 cup Medjool dates (pitted, packed)
Crumbly Cheesecake Coating
- 1/2 cup graham cracker crumbs
- 1/4 cup freeze-dried strawberries (crushed, for garnish)
Instructions
-
1Prepare Cheesecake BaseIn a food processor, combine 1 cup rolled oats, 1 cup vanilla protein powder, 1/2 cup raw cashews (or 1/2 cup cashew butter), 1/2 cup softened light cream cheese, 1/4 cup maple syrup, 1 tsp vanilla extract, 1 tsp lemon zest, and a pinch of sea salt. Process until a thick, uniform dough forms for your No-Bake Strawberry Cheesecake Protein Balls.
-
2Create Strawberry SwirlIn a separate small food processor or blender, combine 1/2 cup crushed freeze-dried strawberries and 1/2 cup pitted Medjool dates. Process until a sticky, jam-like paste forms. This vibrant mixture will add a delicious swirl to your No-Bake Strawberry Cheesecake Protein Balls.
-
3Combine & SwirlAdd the strawberry-date paste to the cheesecake base in the food processor. Pulse a few times until just combined, leaving visible streaks of strawberry for a beautiful swirl effect. Avoid overmixing to maintain the distinct layers in your No-Bake Strawberry Cheesecake Protein Balls.
-
4Form Protein BallsScoop out about 1 tablespoon of the mixture and roll it between your palms to form smooth, bite-sized balls. Repeat until all the mixture is used, yielding approximately 15 protein balls. Place them on a parchment-lined baking sheet.
-
5Prepare Crumb CoatingIn a shallow dish, combine 1/2 cup graham cracker crumbs and 1/4 cup crushed freeze-dried strawberries. Mix well to create a vibrant, crumbly coating. This mixture will add a delightful texture and flavor to the exterior of your protein balls.
-
6Coat & ChillRoll each protein ball in the graham cracker and strawberry crumb mixture, pressing gently to ensure an even coating. Once coated, arrange the No-Bake Strawberry Cheesecake Protein Balls back on the parchment-lined sheet. Refrigerate for at least 30 minutes to firm up.
Notes
For best texture, store your No-Bake Strawberry Cheesecake Protein Balls in an airtight container in the refrigerator for up to one week, or freeze for up to one month.
If you don't have raw cashews, 1/2 cup of cashew butter works perfectly. You can also substitute maple syrup with agave nectar or honey for similar sweetness.
Soaking raw cashews for at least 30 minutes (or overnight) and draining them thoroughly will result in an even creamier cheesecake core.
Enjoy these delightful protein balls as a quick breakfast on the go, a post-workout snack, or a healthy dessert alternative.
Equipment
Please check ingredients for potential allergens and consult a health professional if in doubt.
Nutrition Facts
It is important to consider this information as approximate and not to use it as definitive health advice.
Comments
Leave a Comment