



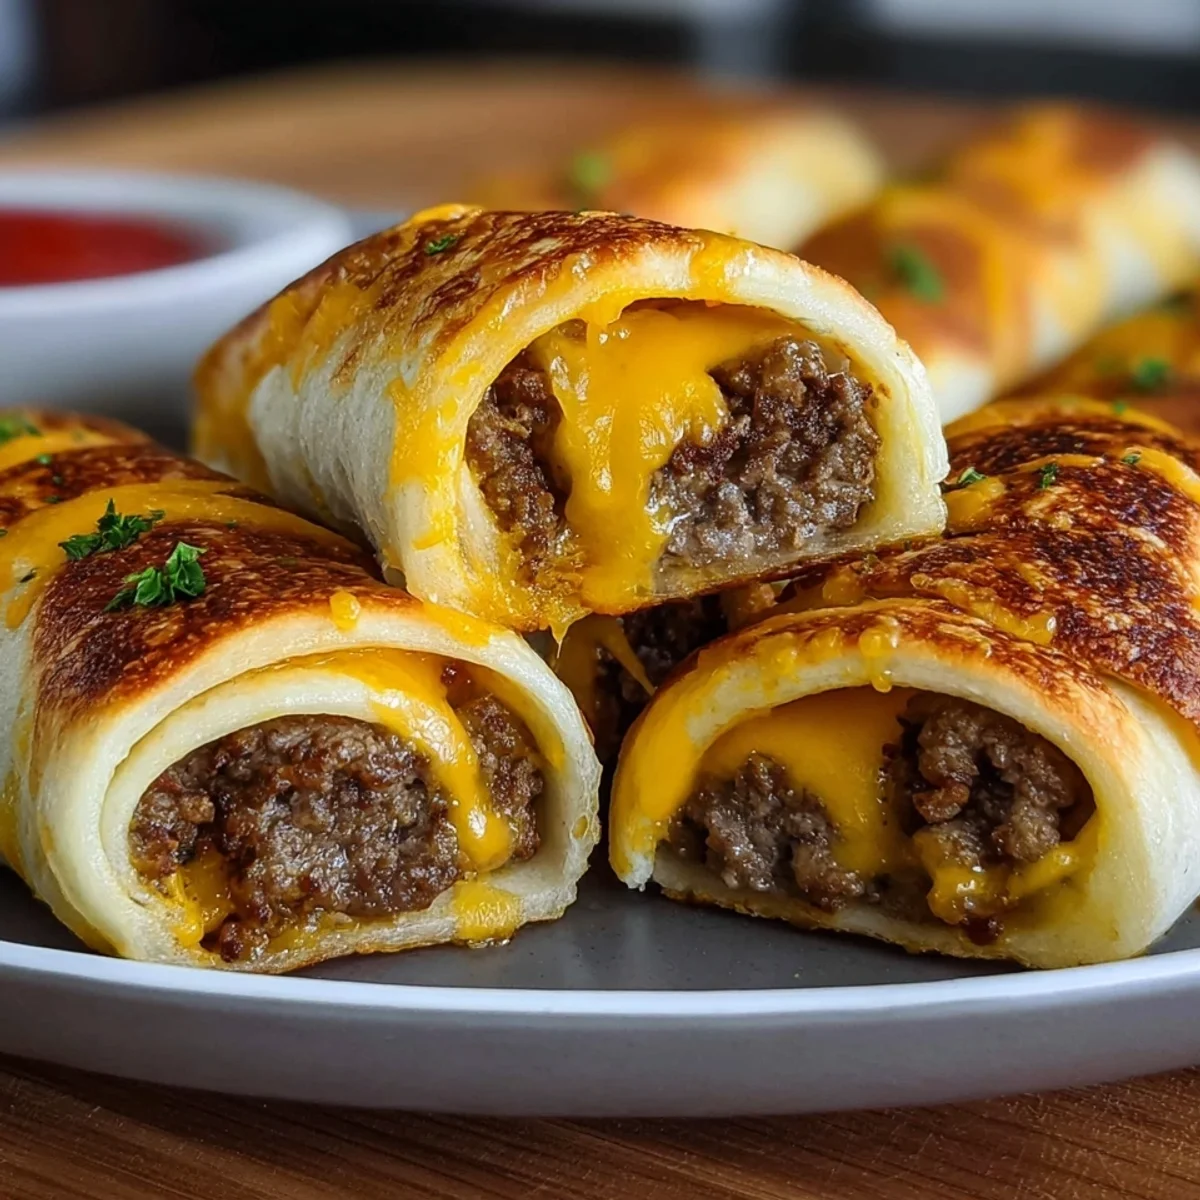
Craving a cheeseburger without the bun? These quick beef cheeseburger rollups pack all the classic flavors into an easy, family-friendly dinner solution.
Okay, so picture this: it was a Tuesday, kids were hangry, and I was staring at a pound of ground beef with zero inspiration. I wanted burgers, but not the whole bun-and-grill fuss. That's when the idea for beef Cheeseburger Rollups popped into my head! I mean, who doesn't love a cheeseburger, right? But wrapped up in a tortilla and baked? Genius! This recipe saved my sanity that night, and honestly, it's been a family favorite ever since. So quick, so easy, and oh-so-delicious!
Oh man, the first time I made these, I got a little too excited with the cheese. I piled it on, thinking 'more cheese, more happiness!' Well, it melted out everywhere in the oven, creating a delicious but sticky, cheesy crust on my baking sheet. Oops! My husband still jokes about the 'cheese waterfall incident.' Lesson learned: a generous amount is good, but don't go overboard!
What You'll Need for These Beef Cheeseburger Rollups
- 1 lb lean ground beef (90/10): This is the star of our beef Cheeseburger Rollups! I always go for 90/10 lean ground beef. Why? Because you get fantastic flavor without a ton of grease to drain. Nobody wants soggy rollups, right? Plus, it browns beautifully, creating that perfect savory base that makes these rollups so satisfying. It’s the hearty core of our cheeseburger experience, hon.
- 1/2 yellow onion, finely diced: Onions are non-negotiable for me in almost any savory dish. Finely dicing them here means they melt into the beef mixture, adding a subtle sweetness and aromatic depth without any chunky bits. It's that background flavor hero that makes everything taste more 'cooked from scratch.' Don't skip this step, it truly elevates the whole dish!
- 2 cloves garlic, minced: Garlic, my old friend! Is there anything it can't make better? Minced garlic brings a punchy, savory warmth that just screams comfort food. It pairs so well with the beef and spices, creating that classic American diner vibe we're going for. Always use fresh garlic if you can, the flavor difference is huge, honestly.
- 1 tsp smoked paprika: Okay, this is my secret weapon for these beef Cheeseburger Rollups! Smoked paprika isn't just color, it adds this incredible, smoky depth that mimics a grilled burger. It’s a game-changer, giving the filling that authentic 'charred' flavor without needing a grill. Don't use regular paprika here, the smoked stuff is where the magic happens, trust me.
- 8 (8-inch) flour tortillas: Ah, the humble flour tortilla! These are our edible wrappers for all that cheeseburger goodness. I like the 8-inch size because it's just right for a hearty serving without being too bulky. They get slightly crispy on the edges in the oven, making for a lovely contrast to the soft, savory filling. They hold everything together perfectly!
- 1 cup shredded sharp cheddar cheese: What's a cheeseburger without cheese? Sharp cheddar is my go-to for these rollups. It melts beautifully and has that tangy, bold flavor that stands up to the beef and spices. Pre-shredded is fine for convenience, but if you grate your own, it melts even smoother. It’s the gooey, cheesy hug that completes the experience.
Whipping Up Your Own Beef Cheeseburger Rollups: Step-by-Step
- Step 1: Brown Beef Mixture:
- First things first, get that ground beef into a hot skillet. Hear that sizzle? That's the sound of deliciousness starting! Break it up with a spoon, browning it until there’s no pink left. This step is crucial for developing deep flavor. Don't forget to drain off any excess fat, we want tasty, not greasy, Beef Cheeseburger Rollups! A good brown on the beef sets the stage for everything else.
- Step 2: Season & Sauté:
- Now for the aromatics! Add your finely diced onion and minced garlic to the beef. Oh, the smell that fills your kitchen right now! Sauté them until the onion is soft and translucent about 5 minutes. Then, stir in the smoked paprika, garlic powder, onion powder, salt, and pepper. Let those spices toast for a minute, it really wakes up their flavor and makes the filling for our Beef Cheeseburger Rollups sing!
- Step 3: Flavor the Filling:
- Time to bring it all together! Remove the skillet from the heat. This is where we make sure our filling for the Beef Cheeseburger Rollups is extra flavorful. Stir in half of the shredded cheddar cheese right into the hot beef mixture. It’ll get wonderfully melty and incorporated, adding a creamy, cheesy dimension that makes every bite amazing. Give it a good mix until everything is combined and gooey.
- Step 4: Assemble Rollups:
- Okay, let's build these beauties! Lay out your tortillas. Spoon a generous amount of that cheesy beef mixture down the center of each tortilla. Don't overfill, or they'll burst! Sprinkle a little more shredded cheddar over the beef. Then, fold in the sides of the tortilla, and roll it up tightly from one end. Place them seam-side down in your prepared baking dish. This is where the magic starts to take shape!
- Step 5: Bake Until Golden:
- Pop those assembled Beef Cheeseburger Rollups into your preheated oven. Watching them bake is half the fun! You’ll see the tortillas turn a lovely golden brown and get slightly crispy, while the cheese inside gets all bubbly and melty. The aroma that fills your kitchen is just incredible. Bake them until they're heated through and golden usually about 15-20 minutes. Pure perfection!
- Step 6: Prepare Fresh Toppings:
- While your rollups are baking, get your toppings ready! Think crisp lettuce, juicy tomatoes, tangy pickles, or even a dollop of special sauce. These fresh elements are essential for that true cheeseburger experience. A little crunch and coolness against the warm, savory rollup? Yes, please! It’s all about customizing your plate, hon.
Cooking these Beef Cheeseburger Rollups always feels like a little victory in my kitchen. It's that perfect blend of comfort food nostalgia with a fresh, easy twist. The smells, the simple process, the joy on my family's faces it's why I love to cook. It’s just so satisfying to create something so delicious with minimal fuss.
Keeping Your Beef Cheeseburger Rollups Fresh
Okay, so you've got leftover rollups? Lucky you! Store them in an airtight container in the fridge for up to 3-4 days. Reheating is easy peasy: pop them in the microwave for a minute or two, or better yet, warm them in a toaster oven or air fryer at 350°F (175°C) for about 10-15 minutes until crispy and heated through. I once tried just leaving them on the counter overnight (oops, busy mom brain!), and let's just say that was a mistake. They got... sad. Don't be like me! Keep them sealed up. You can also freeze them uncooked for later, just thaw and bake as directed. So handy!

Swapping Ingredients in Your Beef Cheeseburger Rollups
I've played around with these a lot! If you're not a fan of sharp cheddar, feel free to swap it for Colby Jack, Monterey Jack, or even a mild cheddar. They all melt beautifully. For the ground beef, ground turkey or chicken works too, but you might want to add a bit more seasoning to boost the flavor. If you're out of smoked paprika, a pinch of chili powder can give a similar smoky depth, but honestly, smoked paprika is best. Want a little kick? Add a tiny dash of cayenne pepper to the beef mixture. And for tortillas, corn tortillas could work for a gluten-free option, but they tend to be a bit more fragile. Flour tortillas are my go-to for durability and chew.
Perfect Pairings for Beef Cheeseburger Rollups
Alright, so you've got your gorgeous rollups hot out of the oven. What next? My favorite way to serve them is with a big, fresh side salad something crunchy with a light vinaigrette to cut through the richness. Or, for a classic diner feel, a side of crispy oven fries or sweet potato fries is always a hit. Don't forget your favorite dipping sauces! Ketchup and mustard are a must, but a zesty 'special sauce' (mayo, ketchup, relish, a dash of hot sauce) takes these to the next level. Sometimes, I even serve them with a simple pickle spear. It’s all about building that perfect cheeseburger experience, just in rollup form!
The Story Behind Beef Cheeseburger Rollups
The idea for these, honestly, feels like a natural evolution of classic American comfort food. Think about it: the cheeseburger is iconic, and the rollup or burrito concept is all about portability and convenience, a staple in so many cultures. This recipe isn't from some ancient cookbook, it's more of a modern kitchen hack, born from the need for quick, satisfying family dinners. For me, it was about taking those beloved flavors and making them weeknight-friendly. It’s that blend of familiar taste with an unexpected, easy-to-eat format that makes them so popular. It’s American ingenuity meets dinner dilemma, right in your kitchen!
So there you have it, friends my beloved Beef Cheeseburger Rollups! They're a testament to how simple ingredients can create something truly special and comforting. I hope you give them a try and make them your own weeknight hero. What are your favorite toppings? Share your rollup adventures in the comments below! Happy cooking, everyone!

Got Questions About Beef Cheeseburger Rollups?
- → Can I make Beef Cheeseburger Rollups ahead of time?
Absolutely! You can assemble the rollups (steps 1-4) and store them uncooked in the fridge for up to 24 hours. Just cover them tightly. When you're ready, pop them straight into the oven and bake as directed. It’s a fantastic way to get a head start on dinner, especially for busy evenings!
- → What kind of tortillas are best for these rollups?
I always go for 8-inch flour tortillas. They're flexible enough to roll without tearing and get nice and crispy in the oven. Corn tortillas can work, but they tend to be a bit more delicate and might crack. Make sure to warm them slightly first for easier rolling, hon!
- → Can I add vegetables to the beef filling?
Totally! Finely diced bell peppers, mushrooms, or even a handful of spinach would be delicious additions. Just sauté them with the onions and garlic until softened before adding the spices. It’s a great way to sneak in some extra veggies, and it makes these Beef Cheeseburger Rollups even heartier!
- → How do I prevent my rollups from getting soggy?
The key is draining all the grease from your ground beef after browning. Also, don't overfill them too much filling can make them heavy. Baking them seam-side down helps keep everything contained and allows the tortillas to crisp up properly. A little crispness is what we're after!
- → Can I use a different type of ground meat?
Yep! Ground turkey or chicken would work just fine as a leaner alternative. Just be aware they might need a bit more seasoning, as they're milder in flavor than beef. You could also try ground pork for a different, richer taste. Experiment and see what you like best!
Quick Beef Cheeseburger Rollups for Easy Dinner
Craving a cheeseburger without the bun? These quick beef cheeseburger rollups pack all the classic flavors into an easy, family-friendly dinner solution.
Ingredients
The Savory Beef Core
- 1 lb lean ground beef (90/10)
- 1/2 yellow onion, finely diced
- 2 cloves garlic, minced
- 1 tsp smoked paprika
- 1/2 tsp garlic powder
- 1/2 tsp onion powder
- Salt and black pepper to taste
Cheesy Wrapper
- 8 (8-inch) flour tortillas
- 1 cup shredded sharp cheddar cheese
Classic Burger Fixings
- 1/4 cup ketchup
- 2 tbsp yellow mustard
- 1/2 cup dill pickle chips, drained and roughly chopped
Fresh Finish
- 1 cup shredded iceberg lettuce, for serving
- 1/2 cup diced ripe tomatoes, for serving
Instructions
-
1Brown Beef MixtureHeat a large skillet over medium-high heat. Add 1 lb lean ground beef and 1/2 yellow onion, finely diced. Cook, breaking up the beef, until browned, about 5-7 minutes. Drain any excess fat. This forms the savory core of your Beef Cheeseburger Rollups | Quick & Easy Dinner.
-
2Season & SautéReturn skillet to medium heat. Add 2 cloves garlic, minced, 1 tsp smoked paprika, 1/2 tsp garlic powder, and 1/2 tsp onion powder to the beef mixture. Season with salt and black pepper to taste. Cook for 1-2 minutes until fragrant.
-
3Flavor the FillingStir in 1/4 cup ketchup, 2 tbsp yellow mustard, and 1/2 cup dill pickle chips, drained and roughly chopped, into the beef mixture. Mix well to combine all the classic burger flavors. This delicious filling is key for your Beef Cheeseburger Rollups | Quick & Easy Dinner.
-
4Assemble RollupsPreheat oven to 375°F. Lay out 8 (8-inch) flour tortillas. Divide the beef mixture evenly among them, spreading it down the center. Sprinkle each with 1 cup shredded sharp cheddar cheese, divided. Roll up each tortilla tightly.
-
5Bake Until GoldenPlace the rolled tortillas seam-side down in a 9x13 inch baking dish. Bake for 12-15 minutes, or until the tortillas are lightly golden and the cheese is melted and bubbly. This step ensures perfectly warm and cheesy Beef Cheeseburger Rollups | Quick & Easy Dinner.
-
6Prepare Fresh ToppingsWhile rollups bake, prepare your fresh toppings. Get ready 1 cup shredded iceberg lettuce and 1/2 cup diced ripe tomatoes for serving. These add a refreshing crunch and burst of flavor to each bite.
-
7Serve & EnjoyRemove the Beef Cheeseburger Rollups | Quick & Easy Dinner from the oven. Serve immediately with the shredded iceberg lettuce and diced ripe tomatoes on the side, or tucked inside for a fresh finish.
Notes
Feel free to swap sharp cheddar for Monterey Jack or a burger blend cheese for a different flavor profile.
You can prepare the beef filling a day in advance and store it in the fridge. Assemble and bake just before serving.
These rollups are fantastic on their own, but also pair well with a side of crispy fries or a simple green salad.
For a touch of heat, add a pinch of red pepper flakes to the beef mixture or a dash of hot sauce before serving.
Equipment
Please check ingredients for potential allergens and consult a health professional if in doubt.
Nutrition Facts
It is important to consider this information as approximate and not to use it as definitive health advice.
Comments
Leave a Comment